Here’s How To Perfect The Armbar In BJJ

Guest post by Evolve MMA, Asia’s premier championship brand for martial arts. It has the most number of World Champions on the planet. Named as the #1 ranked martial arts organization in Asia by CNN, Yahoo! Sports, FOX Sports, Evolve MMA is the top rated BJJ gym in Singapore. As perhaps the most iconic submission hold in all of Brazilian … Read more

Guest post by Evolve MMA, Asia’s premier championship brand for martial arts. It has the most number of World Champions on the planet. Named as the #1 ranked martial arts organization in Asia by CNN, Yahoo! Sports, FOX Sports, Evolve MMA is the top rated BJJ gym in Singapore.

As perhaps the most iconic submission hold in all of Brazilian Jiu-Jitsu (BJJ), it is unlikely that an individual could take even one week of BJJ classes without being taught the armbar. While you have likely already practiced the armbar thousands of times, if your goal is to perfect this awesome technique than a more methodical approach than just using it as much as possible will be necessary. By following the three steps outlined here, you will be on your way to perfecting the most famous submission hold in all of martial arts!

Relearn The Armbar

While it may seem unnecessary for a seasoned practitioner to relearn a technique as rudimentary as the armbar, if you want to develop the skills necessary to perfect this classic submission hold, then this is a necessary place to start. Whether this requires you to ask your instructor to walk you through a basic instruction after a BJJ class, or for you to attend the beginner class in order to see it displayed in a group setting, it is important to have a qualified teacher display the intricacies of the technique for you.

This will achieve multiple things. First, it will get you thinking about the details of the armbar in a way that you might not have been doing in the present. For instance, you might have been curling your hamstrings when you lay back for the finish out of habit, but by hearing your instructor state “now we curl our hamstrings to prevent our opponent from sitting up,” you will remember the purpose of this action and take extra care to make sure your hamstring curl is keeping your opponent flat on their back.

Second, relearning the technique will allow you to identify and remedy any bad habits that may have persisted throughout your use of the technique. Even if you have finished hundreds of opponents and training partners with your armbar, it is still possible that you might have a bad habit or too that if remedied, could make your finish even better! Hearing a detailed explanation will allow you to identify any potential flaws in your technique, bringing you one step closer to a perfect armbar!

Drill, Drill, Drill

Now that you have made sure your understanding of the armbar is 100% correct by relearning the technique from a qualified instructor, it is time to start practicing it by drilling it repetitively. This likely isn’t the first time you’ve heard that the best way to get good at one specific move is to drill it over and over, but in order to perfect the armbar (or any other technique), it is important to make sure you are drilling in the most efficient, constructive manner.

First, you have to drill with a purpose. Too often, when we drill, we view it as a mundane task we must get through before we can start having fun when we roll. Instead, understand that you are drilling for a purpose: to make sure your body knows exactly what to do when the time comes to execute the armbar in a live scenario. Start your drilling speed slow, taking care to ensure that your hands, elbows, hips, knees, feet, and every other part of your body is in the correct place. Gradually increase the speed at which you execute the armbar, but never go so fast that your technique becomes shoddy; drilling poor technique will not only not make your armbar better, it will actually reinforce the incorrect habits and make it worse!

As drilling can get quite repetitive and boring, it is important to mix it up in order to stay engaged and focused. Once you are feeling comfortable with the standard armbar from mount and guard, feel free to start your drilling from a more uncommon scenario. For example, maybe you want to drill the Judo-style armbar from the turtle position that was utilized extensively by Ronda Rousey. By practicing the armbar in this fashion, not only will you be engaged in your drilling, but you will be practicing the intricate finishing mechanics of the armbar on every repetition, along with the specific setup from the Turtle position. The armbar can be attacked from almost every position in grappling, so don’t hesitate to get creative!

Focus On The Armbar

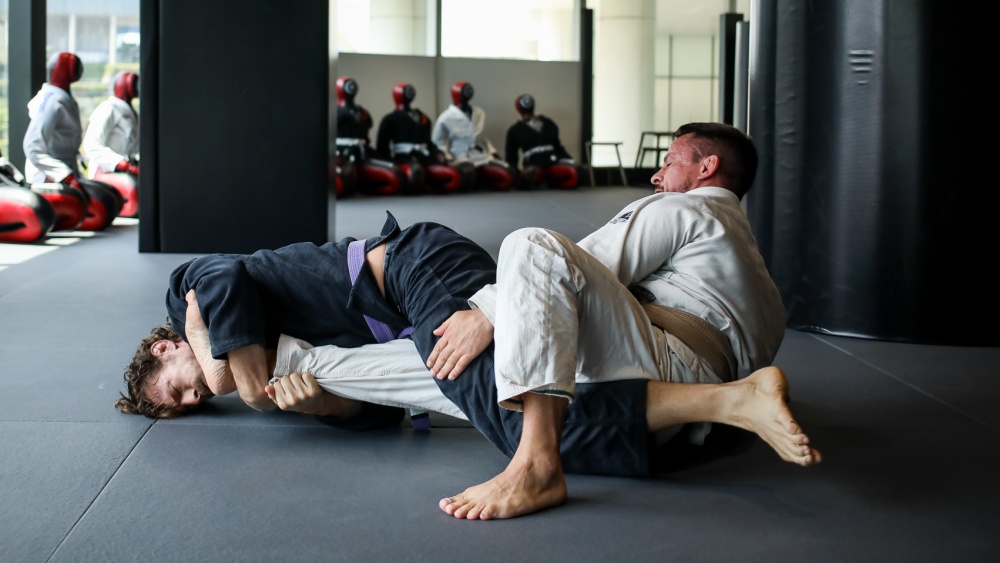
Now that you have made sure you know the proper technique for an armbar, and have practiced that technique through drilling, it is time to start looking for the armbar at every opportunity during your live rolls. This isn’t to say that you should throw the mantra of “position before submission” out the window and dive on every arm that is extended, but it does mean that you should give the armbar priority over other submission holds and positional transitions. For instance, if you find yourself in the mount position, and your opponent is turning aggressively in an attempt to escape from underneath you, you will have the option to attack an armbar or take their back. While it is never bad to have back control, as we are working towards the goal of perfecting the armbar, it would be wise to pursue the armbar against this resisting opponent. This will allow us to either be successful, or our opponent will escape, providing us with insight into what part of our technique needs to be worked on!

As the armbar is often one of the first things taught to a new BJJ practitioner, it is often written off as a move that is “simple” and not in need of repetitive practice. While the sheer number of armbar repetitions that the average BJJ hobbyist will do throughout their training will likely be enough to allow them to develop a decent armbar, further dedication is necessary if they want to perfect the technique. By taking this approach of relearning the technique, drilling it with a purpose, and then looking for it in your live training, you will be well on your way to perfecting the armbar!

Basic Ashi Garami Positions Explained?

Guest post by Evolve MMA, Asia’s premier championship brand for martial arts. It has the most number of World Champions on the planet. Named as the #1 ranked martial arts organization in Asia by CNN, Yahoo! Sports, FOX Sports, Evolve MMA is the top rated BJJ gym in Singapore. The sport of Brazilian Jiu-Jitsu has been steadily evolving over the past decades. … Read more

Guest post by Evolve MMA, Asia’s premier championship brand for martial arts. It has the most number of World Champions on the planet. Named as the #1 ranked martial arts organization in Asia by CNN, Yahoo! Sports, FOX Sports, Evolve MMA is the top rated BJJ gym in Singapore.

The sport of Brazilian Jiu-Jitsu has been steadily evolving over the past decades. Perhaps one of the most significant improvements in the evolution of BJJ is the acceptance and growth of the leg lock game. It was not too long ago when the thought of even doing leg locks was frowned upon. This means that the leg game was kept relatively unexplored for many years. It has since then gained acceptance and is now considered an integral piece in a competitor’s toolbox. Today, we will talk about the ashi garami positions in BJJ.

What Is Ashi Garami In BJJ?

bjj students training kneebar

In the context of Judo, ashi garami is an attack on an opponent’s leg by using joint locks. It is a submission-based attack that aims to submit the opponent by hyperextending the leg or foot. It is included in the official 29 grappling techniques of the Kodokan.

Over the years, the term ashi garami is now thought of as the controlling mechanism used to isolate the leg using your own body. In simple terms, it means “leg entanglement”. This term became popular with the general public because of John Danaher. John Danaher is a New Zealand-born BJJ blackbelt under Renzo Gracie. He is considered to be one of the best coaches in the modern arena and has produced several world-class athletes in the sport. One look at the body of his work and you’ll understand that this man is one of the key figures on why leg locks are so prevalent in today’s BJJ landscape.

Ashi Garami As A Blanket Term

For the sake of clarity, we will use the term ashi garami as part of a system of leg lock entries. This means that the various leg entanglements that you normally hear are variants of the ashi garami. Some of the most common ones include: standard ashi garami, outside ashi garami, 50/50, and inside sankaku (saddle).

Basic Entries To Ashi Garami

There are many key entries to the ashi garami position. Entries can be defined as techniques coming from establishing grips or transitions coming off from other positions.

De La Riva Guard To Ashi Garami

In this video, Gordon Ryan demonstrates an entry to ashi garami starting from the De La Riva guard. This is an excellent and straightforward entry if your opponent enters your guard knee first, thus getting the inside position. Start by going to the Dela Riva guard and then move to lock your feet towards your opponent’s forward leg. Keep in mind that the outside leg should be on the bottom of the leg configuration. This will give you the leverage to throw your opponent off-balance by switching your hips to the outside. Doing this will force a reaction and allow you to go to either ashi garami and x-guard. You can also sweep from this position as the tripod sweep becomes available.

Ashi Garami Entry From Standing

In this video, Shintaro Higashi and Brian Glick demonstrate a cool entry from the standing position. Note that it looks similar to the basic arm drag in concept, where you force an exposure by using a dragging motion to enter a better position. The main goal is to get into a situation where the foot is vulnerable.

The technique starts by understanding that you need to use the opposite leg in relation to your opponent’s. Meaning that if your opponent leads with his right leg, you match using your left. From here, lower your stance, post using your left arm, and use your right hand to loop near the opponent’s knee. Next is to shoot under the legs using the dragging movement and enter the single leg x-guard. Remember that it is critical to lift your hip when using the single leg x so you can maximize your control as best as possible.

From the single leg x, the goal is to take the opponent down and finish with a submission. You can do this by using a false grip on your opponent’s outside ankle as you turn to the side. This will force your opponent to roll. Follow the roll, go belly down and take the inside leg out. Once you continue to pivot, you’ll end up in the outside ashi garami. This final position will give you a solid opportunity to finish with leg attacks like the heel hook.

Basic Ashi Garami Control

The central importance of the ashi garami position is that it provides the attacker to fully control and isolate the leg. Understand that when learning leg locks, you should be able to first get into the ashi garami position and then attempt to work on submissions. Ashi garami is, therefore, a prerequisite to the submission and is the critical first step into mastering leg locks.

We have already learned two primary entries to the ashi garami position, including sweeps to take the opponent down. The following important concept is how to control an opponent within the ashi garami position. In this video, Rory van Vliet shows the general strategies to control someone in the standard ashi. He gives three essential things to consider: mobilization of the hips, control of the knee, and access to the lever (foot).

Let’s discuss the three essential ingredients in this video. To control the hip, you should ensure that you use the ashi garami position to limit your opponent’s knee as best as you can. You can do this by firmly placing your outside foot towards the hip. Use your inside knee as a support mechanism to block space from the inside position. Doing this will also control the knee, ensuring that your opponent’s knee line will not go past your own knee. Keep in mind that you need to stay glued to your opponent at all times to limit any possibility of escapes.

Start Your Leg Lock Game Here

These are just some basic positions that you can use to build a strong leg lock game. Always take note that studying any system in BJJ takes time to understand and develop. Start by working on the standard ashi garami position and practice the primary entries and control concepts in this article. We guarantee that you’ll see lasting improvements as you continue your journey on the mats.

5 Types Of Hooks In Boxing?

Guest post by Evolve MMA, Asia’s premier championship brand for martial arts. It has the most number of World Champions on the planet. Named as the #1 ranked martial arts organization in Asia by CNN, Yahoo! Sports, FOX Sports, Evolve MMA is the top rated boxing gym in Singapore. It is often a very hot topic of debate, but many aficionados … Read more

Guest post by Evolve MMA, Asia’s premier championship brand for martial arts. It has the most number of World Champions on the planet. Named as the #1 ranked martial arts organization in Asia by CNN, Yahoo! Sports, FOX Sports, Evolve MMA is the top rated boxing gym in Singapore.

It is often a very hot topic of debate, but many aficionados have cited the hook as the single most destructive punch in boxing.

The science behind it is simple. The hook travels the shortest distance from launch to target, transferring power generated from the base to the torso, and eventually to the fist. Although it is easy to execute, it is incredibly difficult to master and takes years of practice to fully utilize.

Some of boxing’s greatest knockout artists in history have employed the most vicious hooks you’ll ever find. From “Iron” Mike Tyson’s devastating hooks to the body, to Roy Jones Jr.’s triple and quadruple hooks, the variations are numerous. For beginners, we have listed a few great additions to your repertoire.

There’s an old adage in boxing that warns never to hook with a hooker. With these awesome techniques, you’ll be on your way to proving that to be absolutely true.

Today, Evolve Daily shares five different kinds of hooks you can add to your boxing arsenal.

1) The Textbook Hook

It’s a classic. But although it can be very simple, it can also be one of the most effective punches to use in almost any situation.

Before you learn any of its variations, it’s important to master the essentials of the textbook hook. Start by launching your fist towards the target, keeping your elbow parallel to your cheekbone. Pay attention to your form and make sure you aren’t throwing the hook wide. Keep it nice and compact, and don’t forget to pivot to shift your weight and momentum correctly. Ensure that you are connecting with only your two largest knuckles.

The textbook hook is a thing of beauty when executed correctly, so practice until you get the form right, then look to add power and speed.

2) The Lead Hook

Although the hook usually comes at the end of a combination, many of the sport’s best fighters have used the hook as a lead punch. When utilized as the first punch in a combination, the hook can catch an opponent off guard.

When throwing a lead hook, it is important not to cock your fist back before throwing. Loading up on your hook like this only decreases its effectivity because the punch is telegraphed. The element of surprise is maintained when the opponent doesn’t expect the lead hook.

Focus on head movement and speed. Constant head movement makes it difficult to telegraph a lead hook because opponents have no indication when it’s coming. Speed, on the other hand, reduces an opponent’s reaction time. Step into the lead hook to add more oomph.

The lead hook often lands with great accuracy due to its unpredictable nature. Subsequently, lead hooks can be followed by more power punches such as the rear straight or the rear uppercut.

3) The Check Hook

Also known as the step-back hook, the check hook is used as a counter to a forward-moving opponent.

Oftentimes, aggressive forward-moving opponents can be hard to deal with. When met with such a foe, it is very easy to revert to a defensive shell and retreat to the ropes where you are susceptible to being cornered. The check hook is an effective way to counter this situation.

The secret to the check hook lies in the footwork. The faster and more explosive your step back is, the more potent the check hook becomes.

Practice your step back repeatedly until you are comfortable with the movement and can dart in and out of range in an instant. It is imperative that you remain light on the feet when performing your step back, as well as pay attention to where your weight is shifting.

Setup your step back so that the weight ends up on your lead leg, then use that leg to push off and execute a textbook hook as your opponent is coming in. If you’ve timed it correctly, your check hook should land with unbelievable force.

4) The Double Hook

A Roy Jones Jr. favorite – the double hook is an awesome way to pepper your opponent with power punches.

Doubling up on the hook, however, is terribly difficult and requires immense shoulder strength. It is recommended that you first master the textbook and lead hook before attempting the double hook.

Furthermore, the double hook needs to be thrown with incredible speed and authority to maximize its effectiveness.

You can also mix it up and throw both the body and head hooks in a double hook sequence. The most important thing to take note of in a double hook combination is to make sure you aren’t leaving yourself open to being countered with a cross. Focus on landing your hooks, but don’t neglect your defense.

When you are more comfortable in launching successive hooks, you can then triple or quadruple the output to force your opponent even more onto the defensive.

5) The Shovel Hook

Last, but certainly not the least, the shovel hook is used to increase the chances of this power punch landing due to its unorthodox angle. The shovel hook is effectively a cross between a regular hook and an uppercut. As such, it is thrown at a somewhat 45-degree angle.

When defensive boxers enter a turtle shell defensive stance, it is very difficult to penetrate. The only way to break through that guard and get through is if you offer your opponent different looks. One way to do this is by punching at angles. The shovel hook gives you the ability to circumvent your opponent’s defense by attacking from an unorthodox position.

Thrown lower than a normal hook, the shovel hook aims at connecting on an opponent’s jaw as opposed to a regular hook which is aimed at the temple.

Once again, speed and head movement are the two essential ingredients to a great shovel hook. The faster and more explosive the hook, the more damage it will do when it lands.

Usually set up with an initial combination, the shovel hook can land with immense force, and because your opponent isn’t used to dealing with this rare punch, he won’t see the shovel hook coming nor would he know how to defend against it.

Try these hook variations the next time you’re in the boxing gym. Practice until you get the form and technique perfect, then gradually add speed and power. You’ll be hooking like an expert in no time!

4 Essential Tips For The Muay Thai Clinch

Guest post by Evolve MMA, Asia’s premier championship brand for martial arts. It has the most number of World Champions on the planet. Named as the #1 ranked martial arts organization in Asia by CNN, Yahoo! Sports, FOX Sports, Evolve MMA is the top rated Muay Thai gym in Singapore. In Muay Thai, one of the best ways to close the distance … Read more

Guest post by Evolve MMA, Asia’s premier championship brand for martial arts. It has the most number of World Champions on the planet. Named as the #1 ranked martial arts organization in Asia by CNN, Yahoo! Sports, FOX Sports, Evolve MMA is the top rated Muay Thai gym in Singapore.

In Muay Thai, one of the best ways to close the distance between you and your opponent is the clinch. It is the closest distance two fighters can get in a fight and still engage. As ideal as it may sound, learning how to clinch can prove to be quite tricky, especially if you’ve just started sparring Muay Thai.

The clinch is a technical aspect of Muay Thai wherein you must hold your opponent in order to launch your attacks, or, most commonly, knee strikes. If you are facing an aggressive opponent, the clinch is a great option to neutralize their attacks and close the distance. To hold your opponent, you have a variety of options such as the double collar tie, single collar tie, bear hug or double underhook clinching positions.

The Double Collar Tie 

Clinch-Entry-Slow-Encroachment-to-Collar-Tie

To get into the double collar tie position, you must use your hands to pull your opponent’s head down and use your elbows to lock his head and shoulders. Doing so will allow you to control him and prevent him from using elbows. While performing the double collar tie, make sure to squeeze your elbows together so your opponent cannot escape. You can also put your hand slightly above the back of your opponent’s head for better control.

The Single Collar Tie

single collar tie

Use your arms to pull your opponent’s head down and slightly lift your elbows to lock his shoulders in place.  From here, use your lead hand to pull on your opponent’s shoulder downward while your elbow locks his forearm and biceps. One arm should be on your opponent’s neck, while the other one should be on his shoulder.

Double Underhook  

Clinch-Defense-Defensive-Clinch-Double-Underhook

If you are faced with a taller opponent, the double underhook hold is a great way to control your opponent. You will usually use the double underhook if you are able to pummel your outside arm inside. If you are looking to throw your opponent, this is a great way to do it. However, if your double underhooks aren’t working, you can posture lower and transition to a bear hug. The bear hug is very similar to the double underhook hold. However, it requires you to position your body lower, which allows you to control your opponent’s hips to take him to the ground.

Now that you’ve gotten your opponent in a clinch, today, Evolve Daily Shares 4 Essential Tips For The Muay Thai Clinch:

1) There Are Many Ways To Attack Your Opponent In The Clinch 

Although knees are the most common form of attack from this position, you can also use punches and elbows. Being in such a close range only allows for these types of attacks. However, the clinch can also be used to off-balance your opponent with a sweep or throw, which you can use to tire your opponent or set up your next attack.

2) Stay In Control

The person who is stronger in the clinch dictates where the rest of the fight goes. Thus, you must never give up control at any point in time. To prevent your opponent from taking control of the fight, you must focus on having 2 points of control at all times such as the head and one of your opponent’s arms.

3) Don’t Let Your Opponent Control Your Neck Or Your Head

ONE Superstar Amir Khan practices his knees in the clinch with multiple-time Muay Thai World Champion Penek Sitnumnoi.

The moment your opponent controls your neck or your head, they control your balance. This means that they also control your ability to defend and attack. To prevent this from happening, maintain your posture and move your hips close into your opponent’s hips. You can also maintain a 50-50 stance with your legs slightly wider than shoulder width.

4) Prevent Your Opponent From Regaining His Posture

Multiple-time Muay Thai World Champion Dejdamrong Sor Amnuaysirichoke started MMA at 37 years old.

Just as important as it is to maintain your posture, you should also prevent your opponent from regaining his posture. When you have your opponent secure in your clinch, you should continue to control the neck and head, forcing your opponent into a broken posture. When your opponent’s posture is broken, it is easier for you to land knees because it is difficult for him to defend in this position. To defend, he needs to regain his posture by straightening out his neck/head.

Although clinching may sound intimidating, don’t worry. It takes awhile to become comfortable in the clinch and years to use it perfectly. As with all Muay Thai techniques, the only way to get better at using the clinch is by drilling it until it becomes second nature. When you’re more comfortable, you can try to incorporate it in your sparring sessions with minimal force. So go on, what are you waiting for? You too, can use the clinch!

The Prominence And History Of BJJ Legend Royce Gracie?

Royce Gracie is the man who put Brazilian Jiu-Jitsu (BJJ) on the map and started MMA’s push into mainstream consciousness. He didn’t develop the grappling art. That credit mostly goes to his father Helio Gracie and his uncle Carlos Gracie. However, Royce was the one who proved the effectiveness of BJJ during the inaugural Ultimate Fighting Championship tournaments, dominating bigger, stronger … Read more

Royce Gracie is the man who put Brazilian Jiu-Jitsu (BJJ) on the map and started MMA’s push into mainstream consciousness. He didn’t develop the grappling art. That credit mostly goes to his father Helio Gracie and his uncle Carlos Gracie. However, Royce was the one who proved the effectiveness of BJJ during the inaugural Ultimate Fighting Championship tournaments, dominating bigger, stronger opponents with a new martial art most people had not seen before at the time. 

Many people who saw Gracie’s performances at the first five UFC tournaments were inspired by them. He won the first two UFC events, then pulled out from the finals of the third tournament due to an injury. He went on to win the fourth tournament and fought to a draw against his rival Ken Shamrock at the fifth tourney. 

The Legend Of Royce Gracie

Born on December 12, 1966, in Rio de Janeiro, Brazil, BJJ has always been a part of Royce Gracie’s life. The son of the founder of what is now known as Gracie Jiu-Jitsu or Brazilian Jiu-Jitsu, his BJJ training started while he was a toddler. 

It was the normal thing to do being a part of the Gracie family. His brothers Royler, Rickson, Relson, and Rorion are all decorated BJJ fighters as well.  

Royce entered his first BJJ competition at the age of eight, and he was skilled enough to train students by the time he was fourteen. He received a blue belt at the age of 16, and he was awarded his black belt a few months before his 18th birthday. Royce decided to move to the U.S. to help his brother Rorion’s BJJ academy there. There was no way to predict what this decision to relocate would lead to. 

Glory Days: A Natural Fighter

Rorion, along with Art Davie and John Milius, went on to create a no-holds-barred tournament that would feature the best fighters from different martial arts. The goal was to determine which combat style was most effective. It was modeled after the Vale Tudo fights that brought many Gracie members like his father fame in Brazil.

They called it the Ultimate Fighting Championship.

Royce already had some Vale Tudo experience from back home in Brazil, and he was selected to represent the family. That turned out to be an incredibly intelligent decision as Royce made it look easy as he methodically took opponents down, peppered them with strikes, and forced them to submit. Those who were too arrogant to tap went to sleep or suffered broken limbs. 

That first UFC tournament was Brazilian Jiu-Jitsu’s introduction to the mainstream. Everyone was talking about it. People couldn’t believe how easily some skinny guy was defeating guys who looked to be twice his size at times. 

BJJ schools started popping up all over the world, as the demand to learn this new martial art that seemed to be superior to all the others grew. 

Royce went on to win the second UFC tournament, reasserting BJJ’s dominance over all other martial arts. He probably would have won the third event, but he ended up withdrawing from the finals due to an injury. He came back with a vengeance for the fourth UFC tourney and left with the title once again. 

The fifth UFC tournament was the first step towards what is now known as mixed martial arts. Time limits were introduced, and a new rule allowed the referee to stand up both fighters if they were stalled on the ground. Ken Shamrock ended up using those rules to his advantage, lasting the entire 36-minute duration of the bout. The fight was ruled a draw. 

Royce left the UFC shortly after. 

He accepted a big-name challenge against one of his uncle Carlson Gracie’s students, Wallid Ismail, to settle a dispute about which Gracie school was stronger. Ismail was one of Carlson’s top students, while Royce was his father’s top disciple. At the time, Ismail had already racked up wins against other members of the family like Ralph and Renzo

Special rules were made for the match between Royce and Ismail, but things didn’t go as planned for the former. Royce ended up getting submitted with a clock choke early in their match. It was Gracie’s first loss on the big stage, but it didn’t stop the feud between the two. A rematch has never been finalized. 

Return To MMA

Disappointed with his results in his return to BJJ competition, Royce decided to go back to mixed martial arts. He signed up with the top MMA promotion in Japan, PRIDE Fighting Championships. He was scheduled to fight UFC champion Mark Kerr in his debut, but he ended up pulling out due to a back injury. 

Royce eventually made his PRIDE debut in 2000, defeating Nobuhiko Takada via unanimous decision. His next fight was against one of the most decorated Japanese fighters at the time, Kazushi Sakuraba. Sakuraba gave Gracie a good scare early in their match, almost catching Royce with a kneebar at the end of the first round. 

The fight between the two lasted over an hour and momentum started to shift towards Sakuraba as the fight progressed. He intelligently used Gracie’s gi against him and seemed to be the better-conditioned fighter. Royce’s team threw in the towel about 90 minutes into the contest as Royce could no longer stand due to a broken femur. 

It was Royce Gracie’s first loss in mixed martial arts. 

Royce went on to fight a few more times in PRIDE and K1 Dynamite, amassing a record of one win and two draws. He returned to the UFC for a catchweight fight against former champion Matt Hughes, but he ended up getting knocked out, suffering his second loss in MMA. 

Gracie managed to turn things around during his next fight, avenging his loss to Sakuraba at Dynamite USA in 2007. Royce won the fight via unanimous decision. He tested positive for anabolic steroids after the fight, but the results of the contest were never overturned. 

Royce returned to MMA after a 9-year break in 2016, defeating his arch-rival Ken Shamrock via knockout. 

An Irreplaceable Legend

Royce Gracie is the father of modern MMA, and he’s the reason BJJ is added to the training programs for law enforcement and military personnel all over the globe.